LabView의 기능중에 컴파일 기능이 있다.

이중 DLL 만들기가 있다.

랩뷰가 생성되는 파일은 M$에서 사용되는 COFF 파일이다.
VCL에서는 OMF 형식으로 되니까.. 이부분을 변환해 줘야 된다고 생각하고 정적으로 불러왔으나 되지 않는다.

혹시나 해서 동적으로 불러보니 잘 된다.. ㅠㅠ(하루 까먹었다..)

우선 형을 정의해 주고..
typedef double (__stdcall *TTempTest)(double);

DLL을 인스턴스로 선언해주고..
HINSTANCE  Dll;

동적으로 생성할  함수형도 미리 선언
TTempTest DLLFunc;

사용하고자 하는 곳에서... (또는 생성부에서...) DLL 로드
둘 중 편한대로 사용..(2000과 XP 모두에서 사용할려면 아래 방식으로 해야 된다고 한다.. 2000 시스템이 없어서 확인 못함... XP는 사용가능)
 Dll = LoadLibrary("Temp.dll");
 Dll = LoadLibraryEx("Temp.dll", NULL, LOAD_LIBRARY_AS_DATAFILE_EXCLUSIVE);

이제 동적으로 불러오고.... 실행...
 DLLFunc = (TTempTest)GetProcAddress(Dll, "TempTest");
 if(DLLFunc)
 {
       DLLFunc(8);
 }

참고로... 화면을 불러오고자 할때에는...

VI 설정화면에서  윈도우 동작을 플로팅으로 해야 한다..
기본으로 할 경우에는 화면이 동작하지 않는다.
그리고 호출시 프런트패널을 보일것인지.. 로드시 보일것인지도 판단하도록 하고..

그리고 While문을 사용할경우에도 주의..하자.. 
그래프나 차트랑 연동될경우..
하나의 창만 나타날수도 있다.

블록다이어그램에서 인보크노드에서 설정해도 된다..

그리고.. 함수의 입출력 부분을 커넥트 처리를 꼭하자.. 이거 안하면 함수의 인자나 반환값을 받을수가 없다.


[원문] http://digital.ni.com/public.nsf/allkb/70995EC2CA1B523386256DD4004F3DE6

Calling a LabVIEW DLL from a CVI or other C/C++ project

Primary Software: LabVIEW Development Systems
Primary Software Version: N/A
Primary Software Fixed Version: N/A
Secondary Software: N/A

Problem: I compiled a DLL in LabVIEW but I can't figure out how to call it from CVI, Visual C/C++, or other Windows development environment.

Solution: When you build a DLL in LabVIEW, three files are created: the DLL file, a LIB file, and an H file (the C/C++ header file). The DLL file contains the functionality that you programmed in LabVIEW, the LIB file contains a stub for loading and calling the DLL function, and the H file contains a function prototype for calling the function that is contained in the LIB file (which ultimately calls the DLL). To use the code in another environment, you can call the DLL directly using LoadLibrary() and GetProcAddress() functions in the Windows SDK or you can link your project with the LIB file and header file so that you simply call the function by name as though it were already in your project. The latter is the easiest and preferred method for most beginning programmers. To do this:

  • Add the LIB file to your C/C++ project.
  • Include the H file at the top of the source file where you want to call your DLL function by using the #include preprocessor directive.
  • Point your compiler to find other LabVIEW .h files like extcode.h, fundtypes.h, and platdefines.h in the C:\Program Files\National Instruments\LabVIEW\cintools subdirectory. These header files define certain types used by LabVIEW and sometimes passed in and out of LabVIEW code depending on your DLL. If LabVIEW is not installed on the development machine, you will need to copy these .h files from the cintools directory to a location where the development computer can find them.
  • Call the function by its name and parameters as specified in the header file.

Note that the LabVIEW runtime engine includes supporting functions that are required for any code built with LabVIEW and used on another computer. The appropriate version of the runtime engine is required to execute a DLL.

Related Links: KnowledgeBase 28185EQO: LabVIEW Run-Time Engine Requirments for DLL Execution

Attachments:

Report Date: 2003-11-04
Last Updated: 2005-11-05
Document ID: 3337DOV4

[원문] http://www.mylv.net/know_new/view.asp?sDiv=&no=157&page=1&txtsearch=DLL&sltsearch=bstitle
http://zone.ni.com/devzone/cda/tut/p/id/3063

LabVIEW 에서 DLL 작성

LabVIEW Application Builder를 사용하면 VIs에서 공유 라이브러리(DDL)를 생성할 수 있으므로 LabWindows/CVI, Microsoft Visual C++ 및 Microsoft Visual Basic과 같은 텍스트 기반의 프로그래밍 언어를 사용하여 공유 라이브러리의 VI를 호출할 수 있습니다.

참고: LabVIEW Professional Development System은 Application Builder를 포함합니다. LabVIEW Base Package 또는 Full Development System을 사용하는 경우, 아래의 관련 링크를 사용하여 Application Builder를 별도로 구입하실 수 있습니다.

아래 대화상자의 필드 설명을 포함하여 공유 라이브러리 생성에 대한 자세한 내용은Help»Contents and Index를 선택하면 이용 가능한 LabVIEW Help를 참조하십시오.

목차:


VI 생성

다음 단계에 따라 화씨 온도를 섭씨 온도로 전환하는 VI를 생성하십시오. VI는 텍스트 기반 프로그래밍 언어에서 쉽게 호출할 수 있습니다.

  1. 다음 방정식을 사용하여 변환을 수행하는 VI를 생성합니다.

Deg C = (Deg F - 32) / 1.8


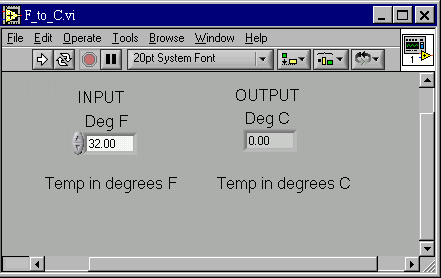
블록다이어그램과 프런트패널은 다음과 같이 나타납니다.


  1. 커넥터 팬(connector pane : 윈도우 우측 상단의 그림에서 오른쪽 마우스 클릭)의 터미널에 컨트롤과 인디케이터를 할당합니다. 이 단계는 DLL을 생성하는 데 필요합니다. 터미널에 컨트롤과 인디케이터 할당하기에 대한 자세한 내용은 Help»Contents and Index를 선택하여 LabVIEW Help를 참조하십시오.
  2. DLL을 생성할 때 VI가 메모리에 있을 수 없으므로 VI를 저장하고 닫습니다.


LabVIEW에서 DLL 생성


다음 단계에 따라 작성한 VI에서 DLL을 생성합니다.

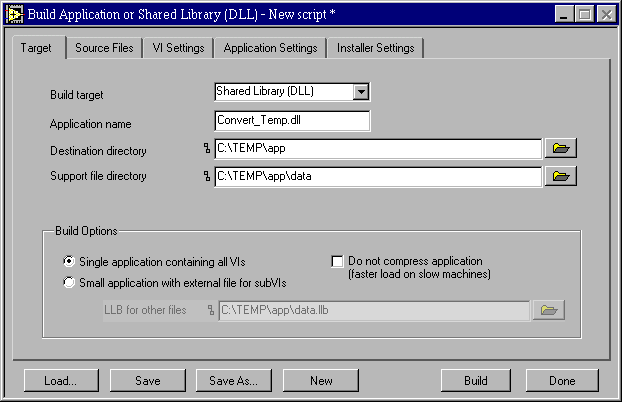
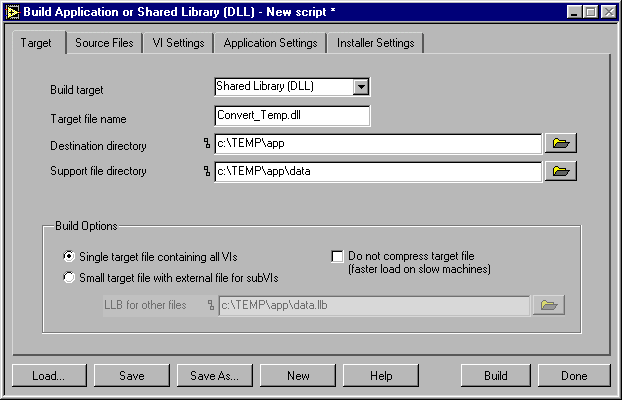
  1. 새 VI를 열고 Tools»Build Application or Shared Library(DLL)를 선택합니다.
  2. Build Target 필드의 Shared Library(DLL)를 선택하고 DLL과 대상 및 지원 디렉토리를 지정합니다.


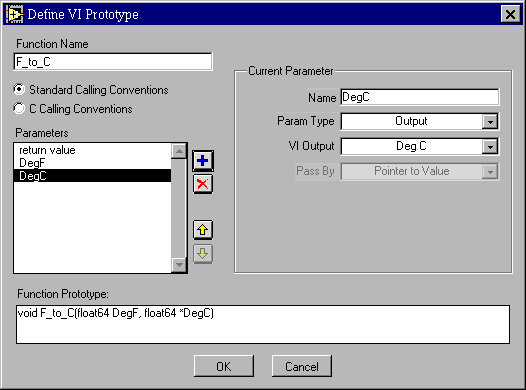
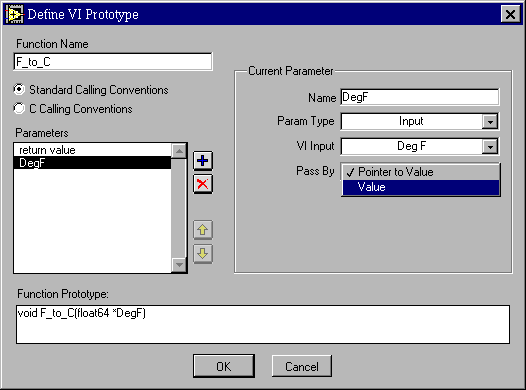
  3. Source Files 탭을 클릭하고 Add Exported VI 버튼을 클릭한 다음 주 VI를 더블 클릭합니다. 그러면 다음과 같은 대화상자가 나타납니다.
  4. 입력 파라미터(DegF)를 선택하고 더하기(+) 버튼을 클릭하여 DLL에 입력을 추가합니다. 또한 파라미터를 값 또는 값에 대한 포인터로 전달할지를 선택합니다. 이 경우 Pass By Field에서 Value를 선택합니다. 함수 프로토타입은 대화상자의 하단에서 바뀝니다.


  5. Deg C 출력과 같은 다른 파라미터에 대해 이전 단계를 반복합니다. 이 출력은 기본적으로 포인터로서 전달됩니다.


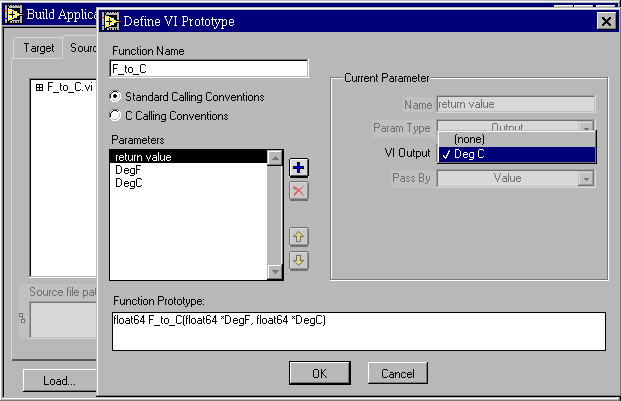
  6. 또 한 함수의 반환 값으로 출력 파라미터를 선택할 수 있습니다. 다음 함수는 void 대신 DegC 64 비트 부동 소수점 수를 반환합니다. 따라서 함수에서 출력을 생성할 때 두 가지 옵션을 사용할 수 있습니다. 출력 파라미터로 추가하거나 반환할 수 있습니다. 다음 함수는 두 가지를 모두 수행합니다.
  7. Define VI Prototype 대화상자에서 OK 버튼을 클릭합니다  
  8.  Build Application or Shared Library (DLL) 대화상자에서 Build 버튼을 클릭하여 DLL을 생성합니다. LabVIEW는 헤더 및 라이브러리 파일과 함께 대상 디렉토리에 DLL을 생성합니다. 이 예에서 대상 디렉토리는 c:\temp\app입니다.

LabVIEW DLL 호출


Microsoft Visual Basic, Microsoft Visual C++., and LabWindows/CVI에서 이 DLL을 호출하는 방법의 예에 대해서는 다음 링크를 참조하십시오.

See Also:
Calling a DLL from Microsoft Visual Basic That Was Generated By LabVIEW 6i
Calling a DLL from Microsoft Visual C++ that Was Generated by LabVIEW 6i
Calling a DLL from LabWindows/CVI That Was Generated by LabVIEW 6i

Related Links:
LabVIEW Application Builder for Windows
LabVIEW Application Builder for Mac OS
LabVIEW Application Builder for Sun Solaris 2
LabVIEW Application Builder for HP-UX
LabVIEW Application Builder for Linux
[원문] http://zone.ni.com/devzone/cda/tut/p/id/3927

LabVIEW 6i can create DLLs that can be used in other programming environments. This document demonstrates how to use Microsoft Visual C++ to call a simple function in a DLL that was generated by LabVIEW 6i. The first two steps in this process are to create the VI and then create a DLL from LabVIEW 6i. The document linked at the bottom of the page shows how this is done.

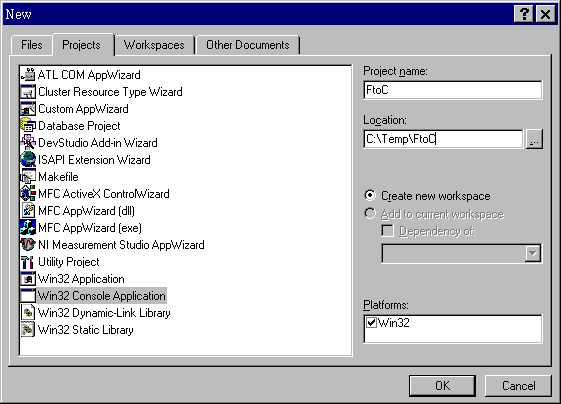
1. Open up a new Visual C++ project by selecting File>>Menu and then selecting the Projects tab. Select the Win32 Console Application and enter a project name and location for it to be stored.

[+] 크게 보기

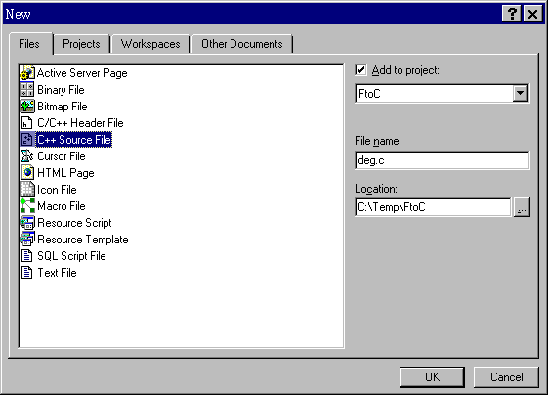
2. Open up a new Visual C++ Source File by selecting File>>Menu and then selecting the Files tab. Select the C++ Source File and enter a file name and location for it to be stored.

[+] 크게 보기

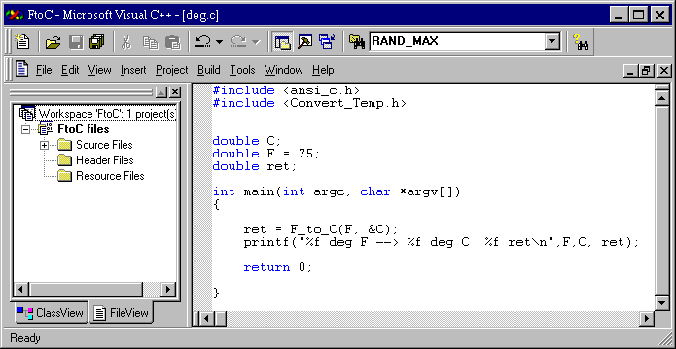
3. Type the source code as shown below. Make sure to include the header file that was created by LabVIEW (Convert_Temp.h). Remember that the function prototype for the DLL that you created was “float64 F_to_C(float64 DegF, float64 *DegC). This code simply calls the temperature conversion VI (F_to_C) and then prints the input (F), output (C), and return (ret) value. Notice that the address of the output (C) must be passed to the function, since it was defined as a Pointer to a Value.


[+] 크게 보기

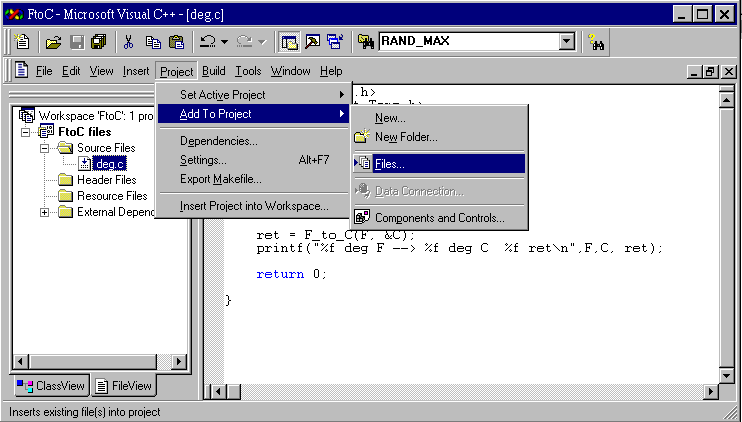
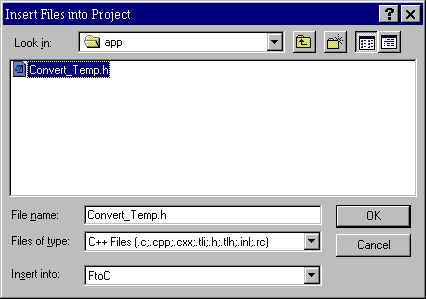
4. Now add the header file that was created by LabVIEW (Convert_Temp.h) to your project. Select Project>>Add To Project>>Files as shown below.


[+] 크게 보기

5. Select the header file and click OK.


6. Repeat Steps 4 & 5 for the library file (Convert_Temp.lib).
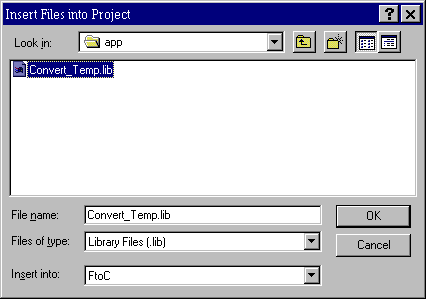


7. Make sure the compiler knows where to locate the header file you added in steps 4 and 5. To let the compiler know where to look for this file, select Tools>>Options from the menu bar.
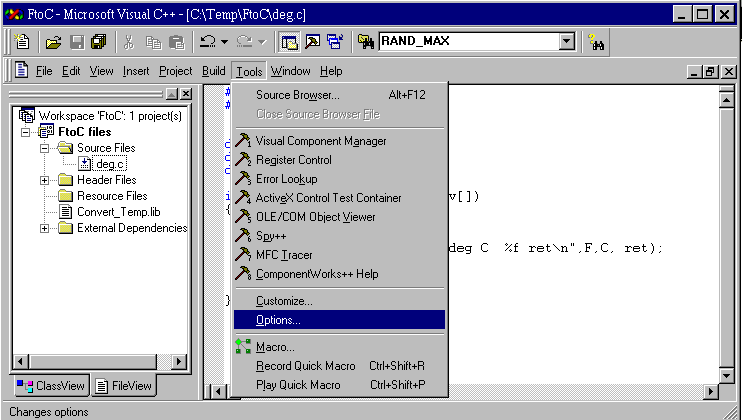

[+] 크게 보기


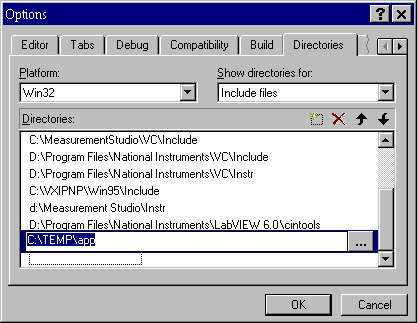
8. Select the Directories tab and select Include files in the Show directories for field. If the path where the header file is located is not listed, add it by clicking the dotted box above the Directories box. The header file that was created by LabVIEW references another header file called extcode.h. This header file contains LabVIEW defined datatypes that you need to call the DLL. It is generally located in the LabVIEW file under cintools, as shown below.


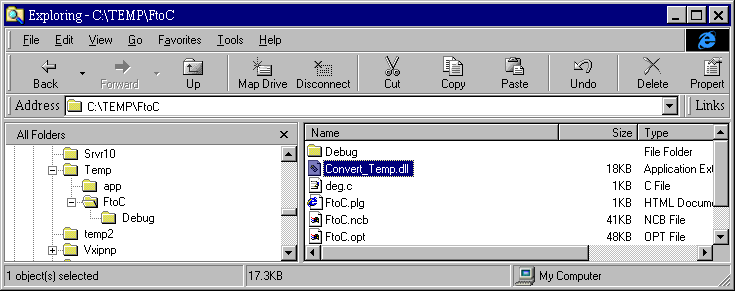
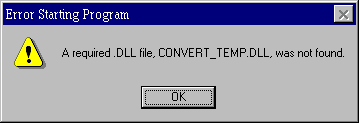
9. Your DLL must be in the same folder as the project, so in this case you must move Convert_Temp.dll from C:\TEMP\app\ to C:\TEMP\FtoC\.

[+] 크게 보기

10. You can now compile and build the executable.
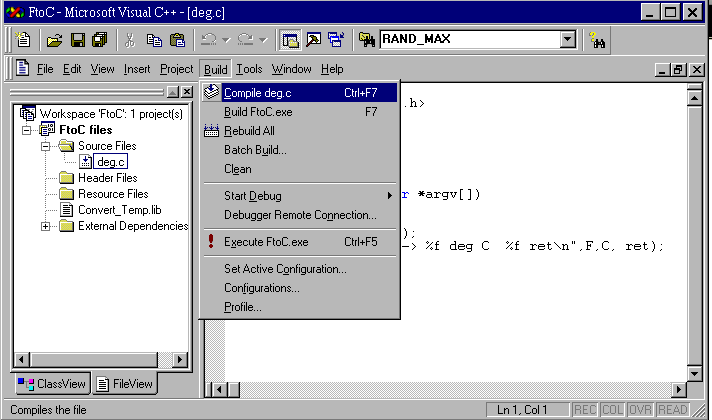

[+] 크게 보기


11. Troubleshooting

If you get the following error when you compile, add the path to the header file. See steps 7 & 8.

c:\temp\ftoc\deg.c(2) : fatal error C1083: Cannot open include file: 'Convert_Temp.h': No such file or directory
Error executing cl.exe.


If you get the following error when you try to run the executable, the DLL file is probably not in the same directory as your project. See step 9.


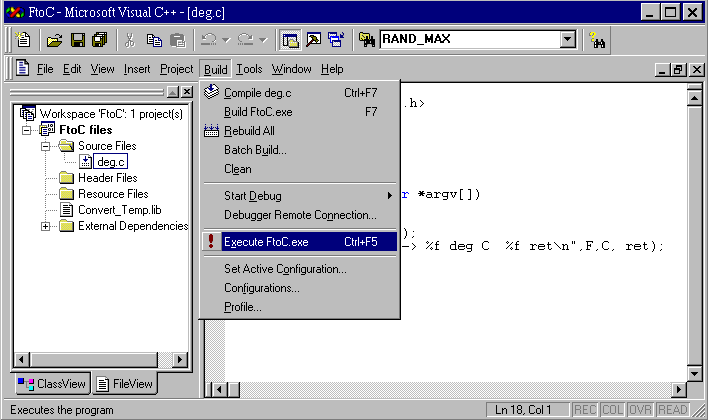
12. Run the executable.


[+] 크게 보기


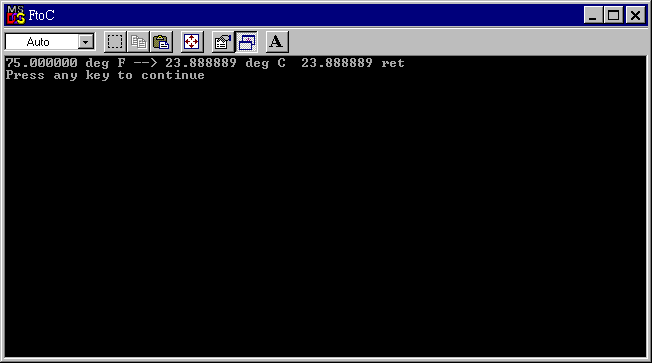
13. Notice that the 75 degrees Fahrenheit was converted to 23.9 degrees Celsius. Also, notice that the return value is equal to 23.9. This is because you set the return value equal to DegC when the DLL was built in LabVIEW.

[+] 크게 보기


-The link shows how the DLL called in this Microsoft Visual C++ example was created in LabVIEW 6i.
+ Recent posts